Announcement

Collapse
No announcement yet.

1967 Pro-Touring 122 Amazon (Project Volvo X)540 Horsepower LS6/Tremec TKO600 5-Speed

Collapse
X
 
  • Filter
  • Time
  • Show
Clear All
new posts

  • 1967 Pro-Touring 122 Amazon (Project Volvo X)540 Horsepower LS6/Tremec TKO600 5-Speed

    I have this build on other forums, and I had some interest in the build from my quarter flare question, so here is the build. So here is the build information, that will catch everyone up on this build.

    I am starting a thread on my 1967 Amazon build, because it will be coming together very quickly. I have not stopped on Project Changling, because I am duplicating key parts for both projects.. Project Changling will be marketing the Flush Mount Glass Kits along with the Newly Designed Crossmember/Suspension kit I am releasing shortly.

    The goal of the Volvo X build, is to build a Daily Driver/Track Friendly car, that has all the comforts of a newer car, and my company is working with several other product suppliers to get these cars product options caught up to the mainstream builds.. I have been asked why I have gone with the Volvo Builds at this time. All I can say is, they need alot of support, and it is much easier to stand out in the Pro-Touring build community with an uncommon and awsome styled car like the Amazon/P1800, because the Camaro's, Chevelle's, Mustang's, ect, are way over done.. LOL

    This Amazon will have the Crossmember/Suspension kit that my company is producing, so the car will now have.

    Rack and Pinion Steering
    Tubular Control Arms
    Adjustable Coil Over Suspension
    Quick Adjust ride height Feature with the Front and Rear Suspension
    Rear Adjustable Coil Over Suspension with Adjustable 4-link arms.
    14 inch Wilwood Drilled/Slotted front rotor assemblies with 6 Piston Calipers
    13 inch Rear Wilwood Drilled/Slotted brake kit.

    I am thinking about a nice Satin Paint Job with some sort of striping, and am looking for an industrial look with Satin finished bumpers and trim. As far as body mods go, I may flare out the rear archs a bit, I will be removing the rear reflectors, and remove the large front park lamps. I am not real clear what I am going to do about the bumpers, I see alot of nice cars with the bumpers left on them, so I am very open about that so far.. I would like to consider some sort of Air Dam, that I dont have to kill myself trying to make or make fit, but the bumper would have to be eliminated if an air dam was installed.

    Any suggestions as to direction with the car would be greatly appreciated.. I plan on the car going to the track and hopefully some of the Events the Pro-Touring and Lateral G guys are having so much fun at.. I am tired of hearing about all the fun, and would really like to join in.

    I am also looking for a seasoned driver, that would be interested in helping me post a great time at one of these events.. I plan on giving the car hell myself, at these events, but I am really an amatuer, and I dont need that handicapping the cars capability. This will be a promotional car, so it does need to prove a point to the Purist Volvo Builders out there when it comes to the capability of the suspension products, because I have had a few empty challenges that an stock configured car can compete or beat this build car on the track? I am taking names at this time, and the time will come to put up or shut up.. LOL

    Here are a few Pics of the build, along with some various pics and video's of other builds.

    Here is some current pictures of the stance so far after the suspension install.. In the pictures, I have factory steel wheels and 16inch Factory Mustang Wheels installed. I am not using these wheels in the build.


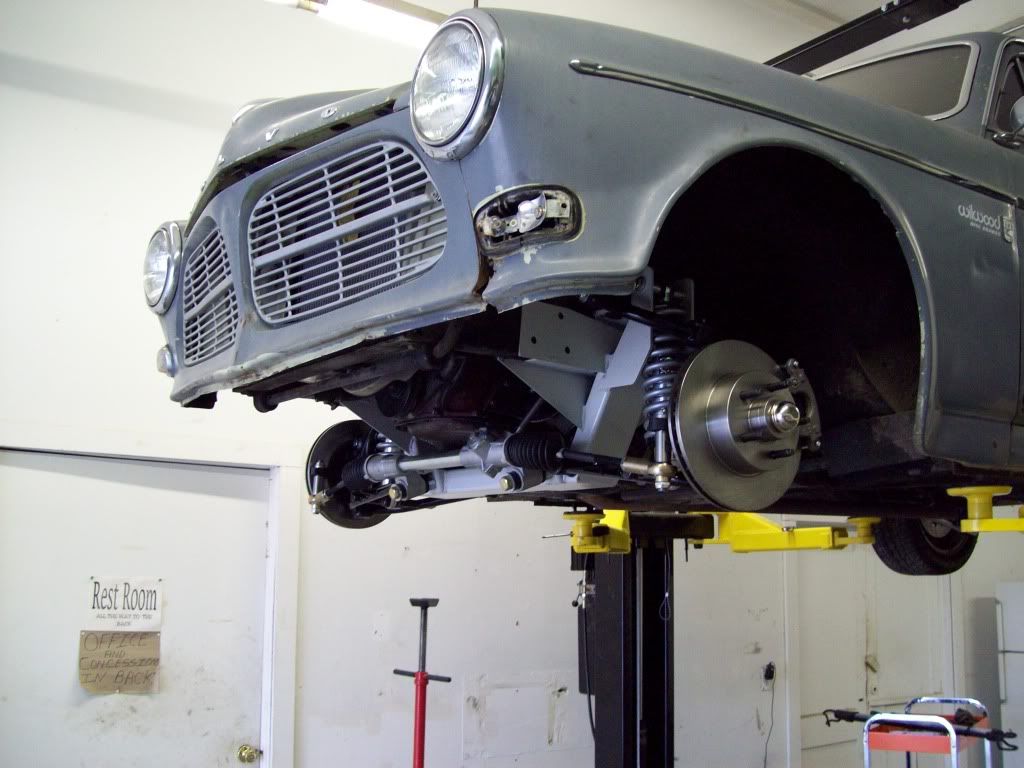
    Here are some pictures of the Prototype Crossmember/Suspension Kit. Pictured are the Standard 11 inch brakes with the base kit. I will post pics of the 14 inch Brake kits, when the actual Production Crossmember/Suspension Kit comes in.


    Here are some pics of the style wheels I plan on running.. These are 19x8.5 front and 19x10 rear.. I may end up stepping it down to an 18 inch wheel if I dont like the overall all stance and ride height. I think the 14 inch Wilwood front brakes, and 13 inch rear brakes, are going to look great with this style wheel.


    Here are a few pictures of various Amazons with different stances and styling.. The first car is factory wheels and factory stance, the others are cars people tweeked..


    Here are a few Youtube videos.. These are running the later Model Upgraded Volvo Turbo Powerplants. The first Video, is a really cool computer generated Police Concept car.

    [ame="http://www.youtube.com/watch?v=GTBU9-8ZsB4"]polisamazon - YouTube[/ame]

    [ame="http://www.youtube.com/watch?v=eBUujJgnVUs"]G.I.S 1967 volvo amazon modified - YouTube[/ame]

    [ame="http://www.youtube.com/watch?v=HYcpP4zxtUA&feature=related"]amazon t5r - YouTube[/ame]
    Last edited by Iamtheonlyreal1; 11-01-2012, 09:21 PM.

  • #2
    Well, there are alot of updates.. LOL New Company Name and logo's, along with more upcoming for the Swedish Ops Online Catalog..

    Here are our completed front end kits.. These are the base models, and they come as pictured. Fully assembled, and ready to install. I have some professional pictures that were taken for the catalogs, but I am waiting on them.. So you will have to deal with my poor picture taking.. LOL


    Here is a 12.19 inch 4 piston Wilwood Upgrade, and we go all the way up to the 14 inch with 6 piston calipers


    Our new Company Name and Logo, along the rear view rendition.. If you look at the rendition, you will see some of the upcoming products that will add to the body features.


    Comment


    • #3
      Here are the DeWitts Radiators made exclusively for the Swedish Ops Catalogs.. They come in Single Core or Dual Core, and are direct bolt in. They will work with the original B18/B20 fan and shroud, or have a electric cooling fan option that comes complete with all the wiring, relays, sensors. Pictured is a single fan configuration, we have currently switch to a dual fan set up for added performance and additional clearance for the Dual core.


      The Dual Core Radiator, it has the capable efficiency for the V8 Conversion, and the Higher Performance Turbo Motors out there.


      Comment


      • #4
        Here are some preliminary pics of the Swedish Ops rear coil over conversion kit we will be using on this build and others we have going on also.. We are adding a Punch Hole finish plate to the bottom opening near the spring pockets, and few other asthetic features, along with finish grinding and full powder coating. This is a bolt in bar that transfers ALL the LOAD back to the original spring pockets.. It is self centering, and will bolt in with out removing the rear axle. We have the Bolt On adapter brackets to convert your original Volvo rear end coil over to accept the coil over mounting..

        This bar give your P1800/Amazon up to 5 inches of incremental ride height settings, from stock to an extreme lowered position. You also have quick adjust ride sensitivity and stiffness settings, with a twist of a knob. We have about unlimited spring load and rate options, so no more settling on what you are looking for in ride height or ride quality. You have the same ride potential at any ride height you choose.

        The rear end pictured, is the Swedish Ops Universal Direct Bolt In rear end. It comes with all the gear ratio and traction options you can ever need, along with a disc brake range of 11in to 14 inch rotors and up to 6 piston Calipers. The aluminum adjustable trailing arms/panhard bar allows you to keep your proper rear end alignment and and pinion angles, no matter the ride height setting.. Another unique feature to this rear end is, it comes in a 54in, 55in, and 56in track width, which will allow you to use a wider variety of common wheels and offsets with out spacers.


        Comment


        • #5
          Here are a few pics with the unit out of the car, you should be able to see how it works.


          Comment


          • #6
            Here are some pics of different views of the P1800/Amazon front and rear kits together.. Keep in mind, this is our base kit with base brakes, but this what you see is the minimum of what you get... All the front end kits come fully assembled and ready to install, no welding, no cutting, so once you have your factory components removed, it literally slide right in and matches up with all the existing Volvo bolt holes.. You can also see the front end kit actually has longer braces forward of the OEM. And we do this, because after you remove the factor steering components, the extra reienforced holes are there to utilize for extra support and bracing of the new front crossmember.


            Comment


            • #7
              Well, it has been a bit since I have updated anything on this car, but there has been alot of development and behind the scenes going on.. I have been waiting for a few more key parts be finished up with the CAD work and cutting programs, so I can install actually production parts on this car.. I didnt want a car on the road, that wasnt actually running the production parts people are buying.. I think it would be a bad thing to take this car to events, and have people notice some key items are different from what Swedish Ops is offering to the public... I hope to have it on th road in the next couple of weeks, and I am waiting on the Production Driveshaft, LS Conversion Radiator, Conversion Headers, and the New LS engine to be delivered..

              Here is the Mock Up Accessorized Ls Engine/Tremec TKO600 5-speed in the hole, and as you can see, it fits great.. Here is the interesting thing about our Front Suspension/Crossmember kits. The motor sits lower and further back than the original 4cyl, but you can drop the oil pan, remove the headers, change spark plugs, change AC compressor/altenator/power steering pump, etc, without even jacking or moving the motor..

              In these pictures, you will see the multi piece firewall conversion mock up, but it has all been CAD'd and in production, so I will be installing the new productionfirewall conversion kit during the new engine replacement. Most of the underhood is still the factory structure, with only the actual firewall changed.. The fender wells, core support, and unibody structure is still factory and un-modified, as you can tell by the factory paint.

              You will also notice the cowl air intake for the heater box is still there, and I cant cut it off, because it has Car Numbers on it, so I am going to use it for a engine compartment heat escape.. I am going to make a nice dual funnel system, that will draw the heat out the cowl vent.. I hope I can make it look right, along with function correctly, because I cant really remove it without potential paperwork problems later..

              I will also be running the Wilwood Pedal Assembly hidden under the dash, with the remote fluid resevoirs, so the brake booster option for the firewall will not be there also.. Once the production Firewall conversion kits is fully installed, things will look much cleaner, and I can prep and paint under the hood..

              Before


              After, before paint and new motor


              Comment


              • #8
                I think I came up with a better idea for the old heater vent. I am going to use the cowl vent as a fresh air vent for the motor, by building a fitler box that attaches where the factory heater box did, and then have two intake runners that will run along the top of the valve covers. I am really considering, having a Louvered Intake Cover that is bridges the gap between the two runners, and will hide the intake and injector wiring.. It should give it a LS Engine Cover look, but be functional?

                The pictured radiator isnt the LS Conversion Radiator and is a single core I had on hand, so the upper water neck is in the wrong location. That is what makes the mock up fabbed intake look too close. I also ran out of the Mock Up intake pieces, sure seems like they would give you more pieces, but you can get the idea..


                Comment


                • #9
                  I should have the 540 horse LS6 here at the beginning of next week, and I am running the Tremec TKO600 with the .82 final drive in 5th, and now I am debating on what rear end gear ratio to start with first.. The car will weigh in at about 2700 pounds, so I was thinking it would be useless to go any lower than 3:42's, but I was thinking of starting with 3:08's. This would be also be a decent posi-trac with 18x9.5 rear wheels, and I think it will still perform very strong there, while getting about a 2000 rpm at about 70mph.

                  Comment


                  • #10
                    Here are some pics of how the underneath is set up, with the Front and Rear Suspension, LS Motor, Tremec TKO 600 5-speed, the Speedway Engineering Mod-Light 9in Rear End, ect.. None of the drivetrain is below the body structure or rockers, so I wont have any Oil Pan ground clearance issues, because it and the transmission are tucked up in the body structure pretty decently. It also appears that there will be plenty of room for a decent sized exhaust pipe, so I can get a decent sounding and free flowing exhaust.

                    The mock up trans crossmember is pretty minimal, and will allow the exhaust pipes to sit in a nice ground clearance position. All of these components are part of our LS Conversion kit, so it should make the job much easier.. The engine stand and transmission mount are totally shimable, so you can dial in what ever angles or drivetrain positions you want..


                    Comment


                    • #11
                      Here are some pics of the finished Replacement Trailing Arm/Panhard Bar kit for the later cars, and I do have the brackets to make them work for the early cars too.. You will also see the new 8.8 Ford rear axle conversion bracket kit, for the guys that dont want to use the heavy duty 9in Mod Light Ford we are using for our V8 Builds.. These brackets are offered in the Do it Yourself fold and weld set up, or we can weld them up for you for a fee.

                      Also pictured is the Rear Coil Over Conversion bar that puts all the weight load back into the original coil spring pockets, instead of installing on the inner sided of the unibody frame rails like most kits do. There is 4 inches of ride height adjustment with this kit, and that is at one inch increments by fliping coil over mount brackets around..

                      Rear Trailing Arm/Panhard Bar kit.. It comes with the standard Rubber Bushing rod end, or the optional Heim Joint set up pictured. As you can see, there is a redesign in the production models versus the earlier pictured arms in the build threads. We had changed to a swedge end set up, because it offers a bit more space, along with making them stronger. This bar set works with the Original Volvo rear axle, so it a direct replacement for all the original arms and bushings.


                      Here is the 8.8 Ford Axle Conversion Bracket Kit... You can see the Do it Yourself version, which are the flat foldable plates, and the finish welded brackets above them. This will make the Ford Mustang/Explorer conversion much easier.


                      Here is the complete kit set up, with the Rear Coil Over Conversion Bar and Coil Overs.


                      Comment


                      • #12
                        Well it turns out I will have to do a bit of flaring to allow the 265/35/18 to fit properly.. I cant belive the actual dimension difference between the 245's that will fit under there, versus the 265's.. I have a set of 225's, 235's, and 245's here, and you can barely tell the difference between all of them in the group, but you put that damn 265 next to the 245, and there is a huge visual size difference..

                        I didnt have to raise the actual arch, but it did have to come out 1.5 inches on the top.. It really seems like alot of extra work, just to gain that extra 1.5 inches, but the 265's look so much better under there.. I know by Pro-Touring standards, that isnt a very large tire. But in this body, and with this vehicle weight, I think it might do the trick.

                        These old Volvo bodies actually start narrowing right after the doors, so the exaggerated rear flares, still dont stick out past the fron fender flares, when you are standing right in front or back of the car.. I used the masking tape (Duct Tape) analaysis on this, because it helps see proportions, with out the overwhelming contrast of welded metat, ground paint, ect. It hasnt grown on me yet, so I will sit on it a day or two before I start the other side. I still have to blend the bottoms into the rockers, but that shouldnt be too bad..


                        Comment


                        • #13
                          I have the Boze V12 Wheels in a 18x9.5 rear and 18x8 front started on, and I also have the 14inch Wilwood Front Disc in the Red 6-piston caliper option, along with the 13 inch Wilwood rear with the matching caliper option..


                          Comment


                          • #14
                            I am getting some of the body work done on the car this week, and at the same time doing some of the necessary body clean up mods. I have found that the Volvo P1800 trunk button is very easy to use on the Amazon, and I think it will potentially make the car much cleaner looking in the rear.. All you have to do is drill a hole for the P1800 button body to fall into, and the mechanicals of the P1800 button will actually work the Amazon trunk release, with no Mods..

                            I am also working on installing the license plate into the bumper, but I have to do a bit of contouring and tweeking still.. I am not set on it yet, but I think it all could potentially work out. I will also be removing the bumper guards, and plan on welding the bumper up, to make it a one piece bumper.

                            Before, with the Amazon Trunk Latch, and original license plate position


                            The after, with the P1800 Button, and the relocated license plate. I am not sure about it yet, but I think it does have some potential


                            Comment


                            • #15
                              The body guy has started on the body work rough in, and I finally have my flares tweeked where I think they will work out fine.. Here are some pictures of the flares ground down, but I still have to do a bit more finish welding..


                              Here are some follow up pictures to the removal of the license plat bracket/trunk latch, and in these pics, the holes are welded up.. I also removed the fuel filler from the back, because with the horsepower I am running, I dont think I will be able to keep gas from sloshing out.. LOL We have our new Swedish Ops fuel tanks in the works, so I hope I have something done in time, so I dont have to temporarily run a fuel cell.


                              I have also removed my front marker/turn signal lights, because I will be adding the turn signals to the custom projector headlamps..


                              I have seen alot of these cars get built with extremely bulky late model seats, and I wanted to steer away from that.. I have been saving this seats for awhile, and I think they will fit the styling of the car.. They actually mounted to the factory Amazon Floor Mount, so I didnt have to change the floor at all.. I will be doing some extra bracing and attachments to the floor mount, because you cant be too safe..


                              Comment

                              Working...
                              X