Announcement

Collapse
No announcement yet.

Turbobrick action, My Volvo with some oz whees.,

Collapse
X
 
  • Filter
  • Time
  • Show
Clear All
new posts

  • #16
    It's been a while But I have had a lot of school work so only small progress i made when i have time for that!
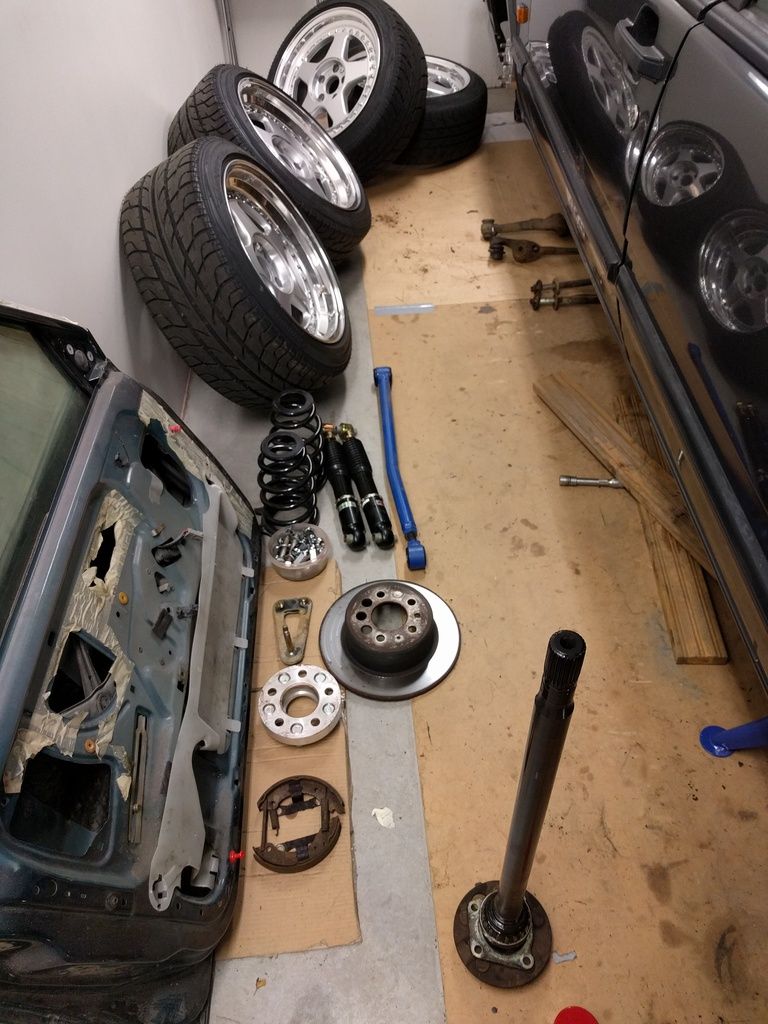
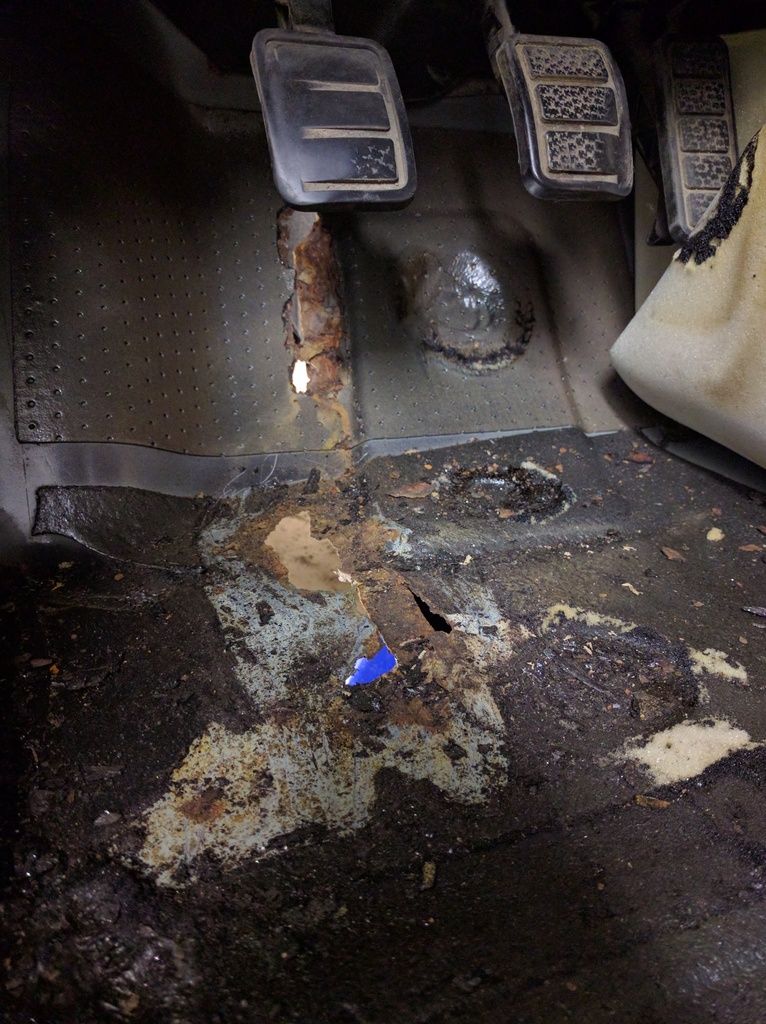
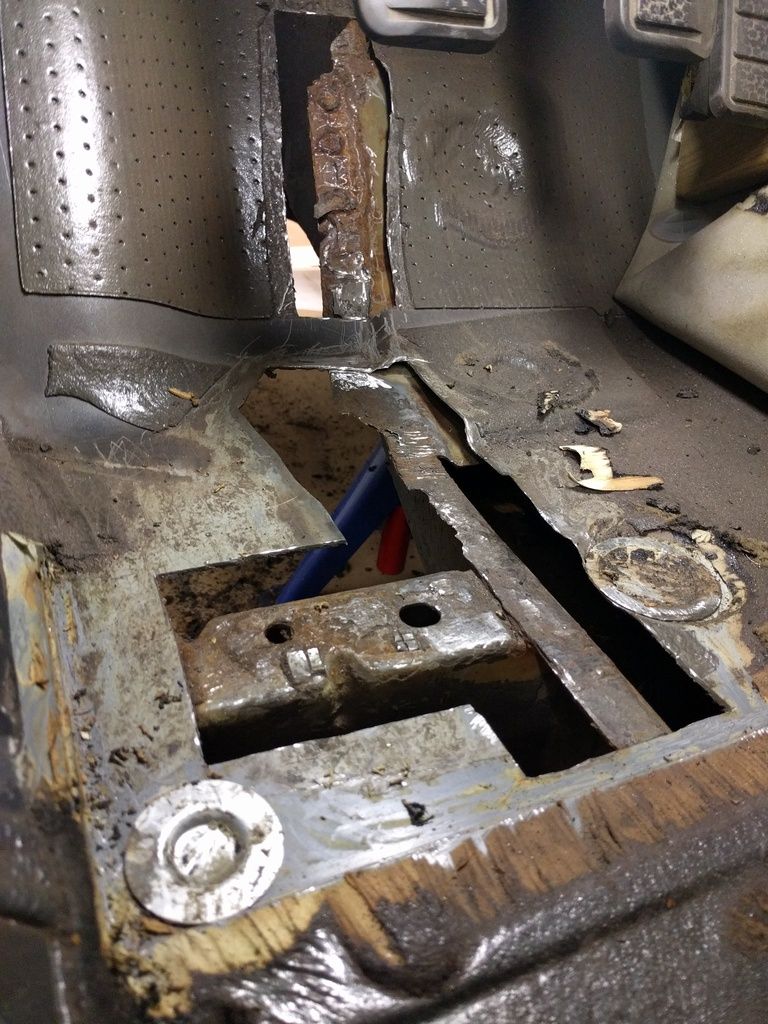
    At the moment the i have disassembled all of the suspension rear axle and support arms those are waiting for sandblasting powdercoating and new bushes. I also found some rot so some welding has to be done Bought mig welding equipment so i have to learn on that a bit! Let see how bad i am at welding! Also planning on doing stainless steel exhaust while it's easy acessible!

    Some pics
     photo IMG_20161030_142548_zpsxzg3f106.jpg

     photo IMG_20161118_205130_zps3ymqj2tc.jpg

     photo IMG_20161120_140114_zpsof9b17cy.jpg

    And yeah I also bought a donor car for the engine swap ! A 1993 e34 525 with m50b25tu and 5-speed zf. Im going to use it as my daily during the winter and strip it a part in the summer as the volvo is driveable again And the plans for the engine are a bit open at the moment. Only thing i know for sure that it's not going to be naturally aspirated. Im not sure about the internals yet. New bearings, piston rings, arp and hoon it or go full crazy and put some forged internals.

    Donor photo IMG_20161210_203418_zpsrsth8csm.jpg

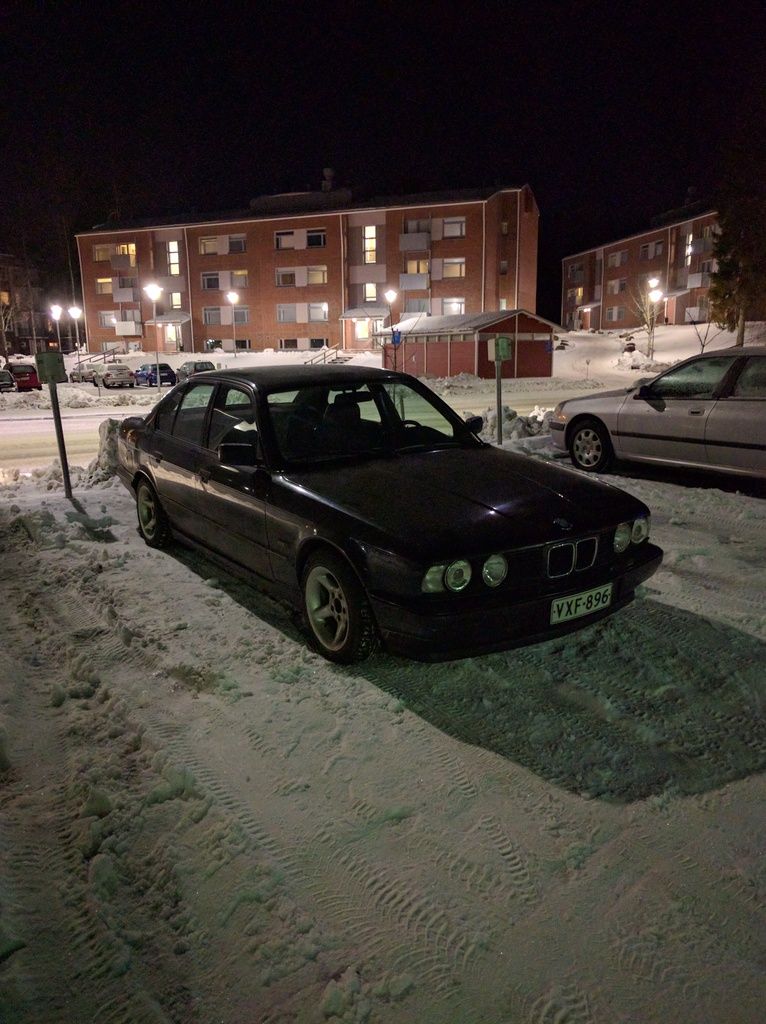
    I was also suprised how nice the car is! Really quite great interior( black leather sport seats) and the engine is great! I will post some more during the christmas holidays as i plan to do some work on the car!

    Comment


    • #17
      Well that was a surprise!
      Hipstagram tberardinucci

      Comment


      • #18
        This looks great. Wheels and lights came out really good! The lights look new.

        Can't wait to see what this car becomes in the future
        Instagram - Benwalsh91

        Comment


        • #19
          wow awesome Volvo!
          Wheels looks bang on!

          Comment


          • #20
            It's been a while

            Luckily something has been happening in the garage during the winter i just have been too lazy to post anything.

            But well to the car! As i posted earlier i found some rot and it took alot longer to get everything welded back together. I dont have any pictures of that unfortunately. But i also found some more rot.


            This is from the drivers side rear jacking point. The car seems to be way more rusty on the drivers side. On the passenger side there's only some surface rust but nothing serious. The rust spot was in quite thight gap so i decided to cut a bigger piece off as it would be easier to weld that back.


            As you can see the hole wasn't that big but it was in a hard spot. When i welded the spot back together i had to weld the inner structure too.


            After that i could weld the outer part.


            I took the pictures after i had grinded the welds as my weld were quite ugly . After everything was welded i primered the metal with some zink primer after that normal primer, sealed the wed with some body glue and after that some car underside paint.


            After i got the metalwork done it was time for new bushes. I took everything apart from the suspension and took everything to sand blasting and powder
            coating.


            Before

            When i got everything back from powdercoating it was time to assembling. As the powder coated parts were looking so nice i changed all rusted bolts and other parts for new ones.


            I also changed the rear brake calipers to new ones and painted the the same color as the front ones. I also painted the front swaybar and panhard bar with the same color.


            I also have alot of suspension upgrades under way but havent taken any pictures frome those yet. But i have new polyurethane bushes for the whole car, some steering upgrade parts, adjustable front swaybar ends and also some exterior upgrades. I still need to source a 25mm rear sway bar and paint it but otherwise the car needs only be assembled to be ready to drive.

            And what comes to th new engine it havent left the donor car yet as it has been my daily driver during the winter months. But things are about to change when i get the volvo out of the garage.

            Comment


            • #21
              OMG love this build and loving the photos even more...

              I've got a 1990 volvo 740 turbo manual m46 (in america) sitting in my garage atm waiting so badly to do a stance works build thread but need to get battery wiring as it doesn't start atm :l

              Also i love the e34, e34 was my first ever whip couldn't afford to keep it though so i downgraded to a volvo :p

              Btw that front 740 lip came with the 2 lower headlights/beams?
              Last edited by 240SS; 05-08-2017, 05:01 PM.

              Comment


              • #22
                Yep. The front lip is all stock .

                Now as my summer "holiday" started as the semester ended i have had alot more time to work on the car and its now in a state that im only waiting for the front bushings to be delivered. It has been nice to be installing clean/new parts to the car.

                Here is some more pictures from the rear axle with the wheels installed.


                Last week i started to prepare the axle to be ready to be installed to the car but i had some setbacks during the week. One is called finish spring. One day it might be sunny and +15 celcius temperature and the next day it might be snowing. well as i was filling the differential with oil when it started snowing and as my garage is so small i was filling it outside... well next day the weather wasn't that bad so i got to continue with the rear axle.


                I assembled everything with new hardware and im aiming that everything looks like new.


                after i had installed the support arms i raised the car so i could just roll the axle in its place but my axle stands were a little too small so ihad to take the other wheel off and wiggle it into place. And as the axle is really heavy it wants a walk in the park .


                but here it sits in its own place. Then i cleaned everything up and installed the axle and suspension parts so it would be easier to assemble everything else around the rear axle. Also installed the braided brake hoses and made sure that everything fits.


                Then assembled and installed the rear extra subframe or what ever its called. I tried to protect everything as it would be shame to scratch the newly painted parts

                Im really looking foward to get to drive this thing with all the new suspension parts! Also **** how the exhaust looks so thats's next on the upgrade list. Probably will be doing full rst exhaust with my friend as he has abit more experience in making exhausts and he has the right equipment to do it.

                Comment


                • #23
                  Keep it up man, fantastic job so far.
                  My Build:

                  Comment


                  • #24
                    This thing is rad. I love the look of 80's Volvo's. Also, Futura's...

                    Comment


                    • #25
                      Wow nice build! I never liked the original US headlights on these but those look fantastic. I think about an inch lower all around would look perfect but regardless this thing looks fantastic.


                      Originally posted by Stupid Kid
                      I need the weed in advance i can't ride my bmx across the ocean unless im high

                      Comment


                      • #26
                        Im back! Or well I havent been gone either just lost my intrest to post up here as photobucket made everyones life hard, but as the photos work again i decided it would be a good time to update my progress here!

                        I got the car running at the end of summer and got to drive it for few months, really enjoyed the new bushings and the swaybars made a huge difference in handling! Also bought a recaro spg bucket seat for the car, that made it also abit more enjoyable on the twisty bits.


                        HereÂ’s a pic from the final drive that year (2017)

                        As you migth remember i bought that 525i well it was parted out during summer and I was left with the m50b25tu engine and zf s5d 310z. Engine is a 2.5 liter ironblock with vanos system and the gearbox is a earlier but as strong model of the famous 5-speed m3 zf 320. The engine was disassembled and inspected and found out to be in really good condition, especially for a 390 000 km driven engine.


                        Engine after it was pulled out from the donor car


                        Some pictures from the disassembly of the engine.


                        Next up i brought the engine to a machine shop for measurement of the cranck and block so that new internals could be ordered.

                        As i said earlier the engine was in really good condition, bore was within tolerances and there were also no signs of wear on the cranck either and it also was within factory tolerances. But next up i ordered wiseco pistons in first owersize, h-profile rods, acl racing bearings and bigger diameter 240mm ligthweight crmo flywheel for m5 clutch. Everything was balanced and the bore was drilled to the wiseco specs, also the head surface was machined.

                        The block stayed in the machine shop for a very long time and during that i did some other smaller stuff for the project.


                        My friend welded a An12 oil return to the cranck case.

                        Did a lot of cleaning on the engine parts, but also I did one very interesting project. Carbonfiber sunroof delete plate. I have read alot from making CF parts, and this was something i wanted to give a try myself.

                        I started the project by making a mold out of the existing sunroof, I added plastic plates to the surroundings to make it possible to be mounted to the existing sunroof mountings. The mould was started by waxing the sunroof with mould release, then a gelcoat surface was painted on top of that, after that a glassfiber body was made for the mould. I also made some extra structure to make sure it stayed in right shape.


                        Mould inner gelcoat surface and outer glassfiber surface.

                        The gelcoat surface needed some filler in some points, to make it possible to remove the CF part from the mould, after that it was polished with paint polishing methods and mould release wax was applied to it. After that it was time to apply the CF to the mould.


                        I added 4 layers of carbonfiber mat to the mould and added one structural stipe to the middle to make sure it wouldnt flap in higher speed.


                        HereÂ’s the final part removed from the mould.

                        As the surface wasn’t perfect i added another layer of resin on top of the surface and sanded it down so that it was smooth.


                        Sanded down part.


                        After it was sanded down i added some clear coat to it. It still needs to be buffed but ill do that when it’s time to install it .

                        Thats it for today, but ive got alot still to come!

                        Comment


                        • #27
                          Still continuing to wait for the engine to come from the machine shop, so i decided to strip the interior as my intention is to do a full stripped interior with a 6-point rollcage. It's a quite a miracle how much stuff is crammed in a car. I did in total 3 trips to the junkyard to take all the excess parts away.


                          Here's some pics from the interiors disassembly and current state.

                          Also removed and sold the old b200et lump.


                          After this i finally received the engine from the machine shop. Started the build by painting the block black with some heatproof paint.


                          After that it was time for the internals. First I gapped the piston rings and gave a good clean to all parts with some brake clean and after that with automatic transmission fluid.


                          Piston and rod ready for assembly and the final product.

                          After that in went the crankshaft and pistons


                          Here you can also see the stressplate for the main bearings that should stiffen the block.

                          After that new m50 oil pump and chain. Also added a vital safety feature for the oil pump a motorsport nut.


                          Then time for the timingchain and cover.


                          Also changed the oilfilter housing to a s54 unit, with oil cooler output and thermostat.


                          Usually for these motors the oil sump should be modified from a e36 one to fit Volvo's, but i stumbled on a e39 unit that seemed to be more suitable shape for Volvos. Well it happened to be a straight fit. As the original engine came with front sump i changed also the pick up tube to e39 one and fitted the new sump.


                          So now the block is ready and next up will be the cylinder head. but will continue on that later!

                          Comment


                          • #28
                            This is fantastic. Subscribed.

                            2001 BMW 560i 6.0 LSx/T56 SOLD


                            2000 Corvette Hardtop FRC

                            Comment


                            • #29
                              So after the bottom end was finished it was time for the cylinder head. My first thoughts were only to do a basic refurbish on the head, check valves and straigthen the head, but when i brought the head for a local head shop focused in rally and performance car cylinder heads the owner of the comppany had a plan in his mind for my head. So long story short I ended up changing the valve springs to stiffer ppf springs and nonvanos m50 inner springs, re shaping the exhaust ports and valve seats. According to the machinist, with these modifications they have achived 860 whp from a similar m50 engine, so this should be better than enough for me. The last restriction for my purposes are the cams. Im now running m50 nonvanos intake cam on exhaust side and stock intake cam. As the engine is cappable of 8500 rpms, the cams will be the restricting part on power and revs. If i cant get to my power goals i will propably go for some better aftermarket cams, catcams etc.

                              Unfortunately i have no pictures of the head either, but next up was to see if the engine would fir in the volvo. I bougth ass(anderson steel & speed) engine mounts and gearbox mount and some polyurethane transmission bushings and went to fit the engine.


                              The fitment was spot on, even the oil pan even looked like it was made to fit a 1980’s volvo ��. The trans and engine mounts were top guality!


                              After the engine was fitted it was time to fit the intercooler and radiator, i opted for a big aluminium griffins radiator and a 600x300x60 intercooler.

                              To mount the i cut every existing mount etc, off the car and decided to make a tube frame, that would act as a support for radiator, oilcooler and intercooler, and also rigid mount for a front splitter to get the old brick a bit more racing inspired look.


                              Splitter and coolers in place for testing


                              A couple of pictures from the making of the tube structure. It was tig welded by my friend and the final tubes to mount it to car are actually at the moment waiting for tig welding. It was facinating to build this kind of structure as i have never before done anything like it. And also it was quite pleasing to see the final product all welded up.

                              Also at the same time i bougth a strut brace kit that was also welded with tig same time as the tube frame.


                              Strut brace welded up. My friend was a bit upset about his welds as they werent as pretty as he would have liked, but for me im more about the function than the form and im happy if it looks good enough and does the job well.

                              After that did some fitting to the car to see how everything would line up.


                              Heres everything fitted in place.

                              As for other small bits and details i opted for a irp bmw short sifter, very nice quality and also for aerocatch hood latches.


                              Ill have to propablu modify the transtunnel a bit to fit the sifter, but i hope that it will be worth it!

                              Also bjought some an fitting fo rthe oil cooler and catch can, and also made a extra an outlet to the valve cover for the catch can.

                              Next up i will be making bracing for everything to be fitted to the engine bay, and also im modifying the rear of the car quite a bit as the fuel cell will be fitted to the trunk!

                              And also heres a picture of my new daily, a long time dream car of mine Saab 900 16 valve, made in Uusikaupunki Finland ��. Will be only doing small maintenance on this one, polishing the paint and doing some maintenance for the car to make it as good as a stock Saab can be!

                              Last edited by Jannes123; 11-21-2018, 02:30 AM.

                              Comment


                              • #30
                                What an awesome project - you do nice work! Looking forward to seeing how that carbon sunroof delete looks trimmed and mounted up. I used to have a mint 850 turbo wagon, and my first car was a Saab, so I'm definitely a fanboy of this thread. Keep it up!

                                Comment

                                Working...
                                X