If this is your first visit, be sure to
check out the FAQ by clicking the
link above. You may have to register
before you can post: click the register link above to proceed. To start viewing messages,
select the forum that you want to visit from the selection below.
Announcement
Collapse
No announcement yet.
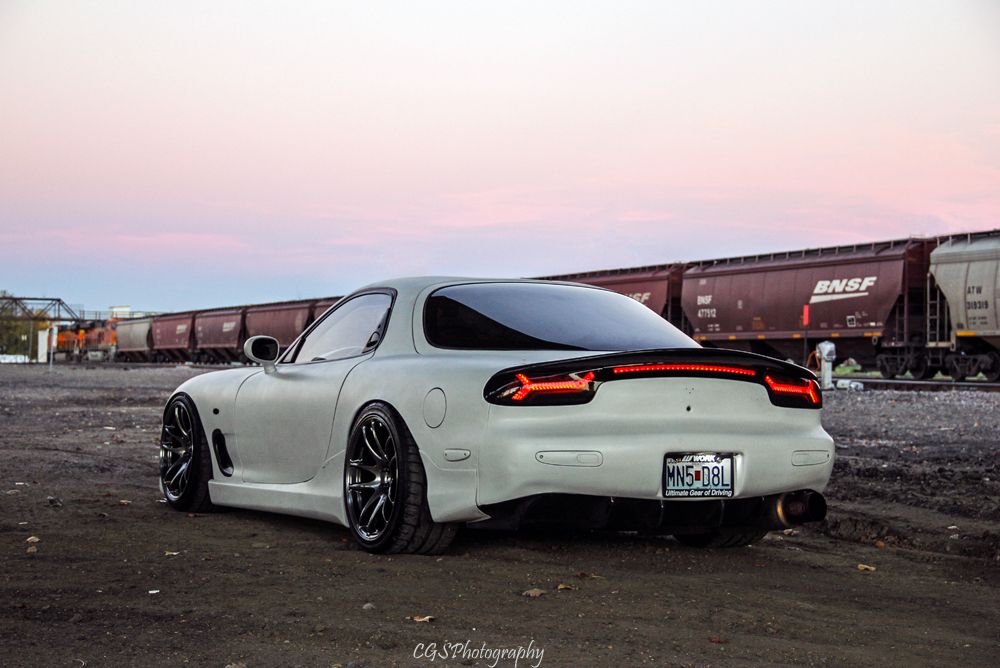
Saving a 1993 FD...400+whp, widebody, shaved bay, etc
This car is intense. In the best way. X2
One question though, why did you paint over the indicators on the bumpers and sides but not remove/shave them? Less work?
I think that goes back to having long winters... Probably be fixed up then, I'd be out driving it as much as I could while the weather holds!
for being a quick and easy job, looks like your headlight turn out well.
ps: side question how much oil are you feeding the holset? what size is it?
Holsets dont like anything less than 10psi at idle and 70psi max, so I just have a restrictor+gauge setup to dial the oil pressure into that range. -4an feed with .096 restrictor and roughly a -12an drain
One question though, why did you paint over the indicators on the bumpers and sides but not remove/shave them? Less work?
Read below, DER E30 hit it on the head. Wanted to get the car in a decent looking and driving state for summer, everything will be done over this winter
About time I updated this. Couple pictures before I tore it down for winter
Motor was bad so the tear down began.
Got my matchbox projectors in! These things are extremely small. They should fit in my headlight bucket perfectly. I also bought a larger projector to go in the other side so I will have dual bi-xenon projectors
Tucked away in the corner of my garage. Unfortunately this is how it sat for about 2-3 months. I kind of lost motivation/was collecting parts. I finally saved up the money to buy the mounting kit so I can make more progress now.
I also sold my current daily and picked up a new one
I'll miss this car
But I love the new one! 2012 Golf R with 17,500 miles at time of purchase. Made a bit of money selling the evo too
Engine bay is almost bare now so I can start sanding it down to bare metal and filling in holes. Bought a sandblaster and paint gun from harbor freight to finish it up. I'll hopefully have more progress pics soon.
I've purchased a looott of parts over the winter. Hinson radiator, clutch cylinder for swap, plastidip kit, granny torque arm, hpp 2in1 diff brace, kaaz 1.5 diff, origin/chargespeed rep widebody, .660 valvesprings, fast 92mm intake, 42lb injectors, holley fuel rails, samberg mount kit, new pillowball bushings...I think that's it. Still a lot left to purchase though.
Over the winter months my basement became more and more full of parts. First from the leftover dsm parts I had, then from parting out the rotary stuff, then from acquiring more lsx based parts. So it was a mess. Finally had enough of it and straightened up one of the rooms.
And then I had to put more shit in the room to get it out of another one, so whatever lol.
So the same could be said for my garage. I had been neglecting it over the months and focusing on acquiring parts for the rx7. Decided I had enough of it too and built a couple shelves and acquired various parts.
Made a shelf to put over my air compressors. The house I am renting doesn't have 220 ran to the garage, so I decided to run two compressors in parallel. This provides more than enough scfm for the future painting I plan on doing.
I have a regulator coming off of each air compressor to prevent each one from getting too much air in the tank, then they tee into the large air/water filter, then go into a smaller air/water filter, and then to the final regulator. Once I start painting I will likely run one more regulator/filter right off of the gun. I really don't want to mess up the paint lol.
And all organized
So anyhow, onto the car. First, I'll start with the engine bay progress. I'll keep all of these in order to give you an idea of how the progress went.
As you can see, the engine bay is basically stripped all the way down, so you can plan on future updates including lots of metal/bondo work and such. I am going to stitch weld everything while it's apart, cut out the middle firewall lip, smooth out all of the firewall indentions, smooth out the strut towers, and fill in the wheel well holes. It should be a good time...
I was set on using the sikky kit for a while, but the purchase of the fast intake ruined that plan. After searching for a used samberg setup, I finally just decided to buy new. I only have a few more parts to buy now. Some sensors and fluids really.
Finally got around to pulling the interior since Ill be rewiring the car and also welding on the firewall.
I really didn't like the idea of leaving the interior red when the car will definitely not be red, but I didn't want to go through stripping the interior paint and all that jazz. So, I decided that I would put in some sound deadener while it's apart. This allows me to quieten down the interior while also getting rid of the red. I won't have to clean the surfaces nearly as much to get it to look nice either. So it's a win win imo. Decided on the Second Skin Spectrum in case anyone is wondering. Ordered 2 gallons, which will only add 20 pounds if I use all of it. Since I will be painting the interior anyhow, I think I may put the subframes back in and get the car on the ground so I can stitch weld the interior seams too. May as well right?
Speaking of putting subframes back in, I pulled out the rear subframe. I'm putting in a Kaaz 1.5 way diff I picked up along with all new pillowballs. While it's apart I'll be cleaning/painting everything.
While pushing out the first pillowball I made a stupid mistake -_- Didn't realize it wasn't the same diameter all the way through and pressed out the inside lip. So a new arm is on its way.
Two more things here and then I'm finished. Picked up the KTS front strut bar and it was well worth the money (autoexe copy). I have very cool plans to modify this and can't wait to do it. Not sure if the motor will fit under the front part, but I'll tackle that problem when it comes.
The last thing that I did 30 minutes ago was order my Leash Electronics Street/Strip wiring board. This thing is amaazziinngg in my opinion. Has inputs/outputs for basically everything you could need. Everything should be ran off of this one board (fuel pump, ecu, fans, headlights, doors, radio, injectors, ac, heater, security system, air lift management etc).
 Tweet
Tweet


Comment