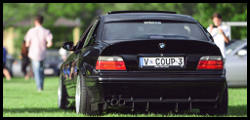
you rocking it !
Announcement
Collapse
No announcement yet.
hakhawks cosmos e36 coupe
Collapse
X
-
had some time to play with the washer bottle today, unfortunately, it didnt fit where i wanted it. well, it did, but it wont fit with an intercooler there
so what to do? what else but modify right?
straight into it with the hacksaw to shorten it down

decided it will best fit under the headlight, and the inlet i'll try and fit anywhere i can get to it for now, but eventually i'll order an oem bmw inlet cap to plumb it to. (you can see the old one in this pic, with the repair that has held up fine)

i slid one piece into the other for some reinforcement, plastic welded the 2 pieces together, filled the bottom section with more material, added a couple screws(mainly to hold sections in position), and added sikaflex around the entire outside of the joins.

i'll leak test it over the weekend, then make some brackets to fit it up. if it leaks, ill add more sikaflex, but going on how well the previous bottle has held up, i think itll be fine.
Comment
-
decided it was time to finally put the oil cooler on today, before the weather starts to crank up.
the m3 motor runs an oil cooler below the radiator from factory, but the one i received had a hole worn in one of the corners(didnt realise until it was almost time to put the motor in), i didnt have time to wait for another cooler to come from overseas, and the factory lines dont make fitting an aftermarket cooler simple without additional parts from overseas(surprise surprise!!)
it was one of those things on my list to do once the car was on the road again, now over 12 months later, im finally doing it.
the coolers mounted in 3 points, feels nice and solid, i used a suggested method i picked up while looking at where other people were mounting theres, which is to run threaded rod from top to bottom of the cooler to add strength, and hopefully stop any chance of the core splitting apart.
i managed to use existing bolt holes in the car, i shouldve taken a pic of the mounts before putting it back in, but i didnt

mocked up where the hoses needed to go, allowing for when the supercharger goes in(lets hope i got it right, if not i need more hose!!). you can see the dodgy bypass i made using the oem cooler hoses which leaks a tiny bit, cant wait to be rid of it.

then i put the fittings on the hoses. the russell swivel fittings make life easy for installation, no need to worry about twsting the hose.

i can install and remove the fittings from the oil cooler with it in place, i just need to unclip the radiator to help line the thread up. yay for copious amounts of room behind the grille.
all buttoned up, and with the black proclassic hose, you can barely tell theres an oil cooler in there.

i havent hooked the lines up to the motor yet, as next weekend i will be giving the motor its 20,000 mile service, so id rather wait a week and do it while theres fresh oil going in.
Comment
-
so the motor got its 20,000 mile service today, which included the following
oil + filter
air filter
plugs
coils
oil cooler
wiper blades
i did plugs and coils because the coils were original, and i plan on replacing all the electrics as i go, in hopes to improve some of the fuel economy and overall reliability. all the parts have done as much as 140,000 miles, so replacing them is better than not. i still need to sort out a laptop to run diagnostics and see what everythings doing properly.

oil cooler lines came out great, so far no leaks, but ill keep an eye on it, will probably have to tighten the fittings after a bit. had to move the carbon canister a bit to clear the lines, but i want to move that out of the engine bay altogether before the charger goes in.

and i received my bbs center cap logos the other day too

Comment
-
You are making me want an E36 real bad, was thinking about it all afternoon. Good work bud.
Comment
-
not much happening, waiting for barrels for wheels, and needing more money to buy more things.
yesterday i installed the "modified" ve washer bottle. couple brackets and some massaging of the reo bar and it fit like a glove

the ve filler neck will be replaced with an oem bmw filler that goes on the radiator shroud when i buy the bits. for now it fits rather snug where it is.

today while waiting for new front tyres to be fitted, i finally pressed out the shafts in the supercharger in prep for a clean up and new bearings. popped another bearing in the process too, so lucky im replacing them. lets hope i get it right the first time, coz im not pulling it apart again!!

the things 9 years old, and still looks near perfect inside. its either been rebuilt at some stage or is just in that good condition

and i put the mini lathe to use machining down the drain fitting to fit nicer. it comes with a basic barbed hose fitting and some rather squishy hose, but i want to change it for an fittings, mainly for the hell of it. not sure if its going to clear the chassis rail yet though.
the nut used to go down to the end of the tapered section, and the whole thing was about 1cm longer, which i cut down and re-tapped. the finish looks like shit because i hit it with the wire wheel to get rid of the left over blue anodizing. i dislike blue fittings.

Comment
-
so oil coolers going well, washer bottle hasnt leaked, car is running great.
got some more parts in yesterday.
this is an oil restrictor for in the head, at high rpms, oil builds up under the rocker cover, taking too long to drain back to the sump, so dumps into the intake manifold. this reduces the size of one of the oil galleries and fixes this. this will go in next year when i measure the valve lifter clearances as the rocker cover has to come off to do it. bolt is to aid installation

then i decided to finally bite the bullet and buy an m3 chassis brace. it was a toss up between this one and an aftermarket one, i decided to go stock, seeing as near everything else is oem. non m3 got just a single bar at the back going between each chassis rail. this one links the rails to the kframe.

took me all of about half an hour to install it. had to add 4x nutserts to the kframe, which i'll double check next time i have the car jacked up.

i sacrifice a bit of ground clearance with it, but not being slammed these days means ill rarely scrape it on anything. it sits a tad lower than the swaybar, and higher than the exhaust

Comment
-
finally changed the odometer to read in km instead of miles. now ill have to revert back to doing everything by km again!! was actually getting used to reading it all in miles. tomorrow im gonna have a play with whatever other settings i can mess with in the bmw software

Comment
-
well, with nothing much else to do this fine christmas day, i ventured down the shed to see how the supercharger case was doing in the parts washer.
hmm, well that didnt go as planned. no more pretty blue vortech logo on the id plate

oh well, grind some rivets down, and remove it. less conspicuous that way!! the plate did hide some imperfections on the casting, but once painted it shouldnt be too bad.

all 3 pieces cleaned, and some rough edges and dags cleaned up. im working friday, so ill grab some supplies, and possibly lay some paint down on the weekend.

Comment
-
cheers dude. i hope its an inspiration for everyone to give things a red hot go!!
last night i ended up drilling some more holes for mounting the charger to the bracket. wasnt over happy with it being held on with only 3 bolts on one end. so now theres 6 that will hold it in place. one will link to a steel bar to hopefully reduce/stop any forward/back flex

then i thought i might have a play with where it sits in the engine bay, to see if my oil drain will clear the chassis, and where the outlet needs to be clocked at.

as is, this wont work. i have a 90deg fitting on the way, once thats here ill see if i can shorten the extension enough. if not, i'll just revert back to regular hose.

oil lines were in the way, so i undid the holder keeping them on the rail. there should be enough slack to move them down to the side of the rail later on. the outlet should clear nicely here, hose will run down around under the rail to the intercooler, so as long as it clears the radiator hose, i should be able to leave it as is.

and this will be the fun bit, the inlet area. not much space between compressor housing and strut tower, so hopefully i can mould an inlet with some of it coming over the top of the charger. will need to check bonnet clearances.

Comment
-
so i did a final clean and masked up the charger today

and now its black


i used vht barrel paint, see how it goes. it wont fully cure until the charger is run and it gets hot, but i think with summer kicking in and it sitting in the shed(ie. oven), it might bake pretty well before then!!


im happy with how it came out, couple runs and rough spots, but theyre in areas you wont see once its on the car.
i'll let it sit for a week or so, then start assembling it
Comment


Comment