 Tweet
Tweet
Really happy to see this coming together as good as it is=)
-
-
Originally posted by Miroteknik View PostOriginally posted by StayONE View PostYou all are so kind, thank youOriginally posted by Earl View Post
They're 18x8.5, ET 32 front, ET 35 + 15mm spacer rear.Originally posted by StayONE View Post
With the soft air ride suspension, I don't think I can reasonably space the wheels out any further than that without major fender work. Were I on stiff coils, I would add 5mm front and rear to get the wheels perfectly flush with the fenders, or even better, run less camber on both ends.Last edited by Oh Damn, it's Sam; 05-29-2014, 12:48 PM.


Comment
-
With a week of not rain on the horizon, I decided to spend the day doing paint correction on the car. You may remember my couple of comments earlier in the thread about living in an industrial park, and a long winter of rain and industrial fallout has left the paint in less than ideal condition. The worst are the trains, which leave rail dust on just about everything. My house is pretty Elwood Blues-ey, with the tracks only about 100 meters from my front door:

Even keeping a coat of wax and sealant on the car for the winter and trying to give it a bath whenever possible didn't prevent the onslaught of contaminants on my paint:

Gross.
The clay came back not black like it usually does, but bright rust red from the amount of metal dust in the air from the tracks. I'm trying Meguiar's new Ultimate Quick Detailer, which is maybe 20% more expensive than the regular stuff. Thoughts: it smells different, and it seems to work way better with clay. I used to always have dragging issues with clay with the red-bottle stuff, and the same with both Griot's and Mothers, but this time the clay glided clean. Pretty impressed, at least for clay bar duties.
I went over the paint a few times with clay, followed by Meguiar's #7 Show Car Glaze to give a little oil back to the paint, 205 on a white buffing pad, and their new Ultimate Wax, which I am still deciding whether I love or not. I've been using Griot's Best in Show wax for a while now, and I like the gloss a lot, but it's hard to remove, cakes up, and god forbid you miss a spot and see it the next day - it's like trying to remove concrete. The Ultimate Wax (which is all synthetics, no wax at all) goes on great, doesn't leave gross white residue on everything, and leaves a nice gloss, but it does have a bit of an oily residue that takes some Quick Detailer to remove.
I did manage to get most of the crap out of the paint. I'd show a pic, but it's clean black paint on an overcast day; there's not much to see.
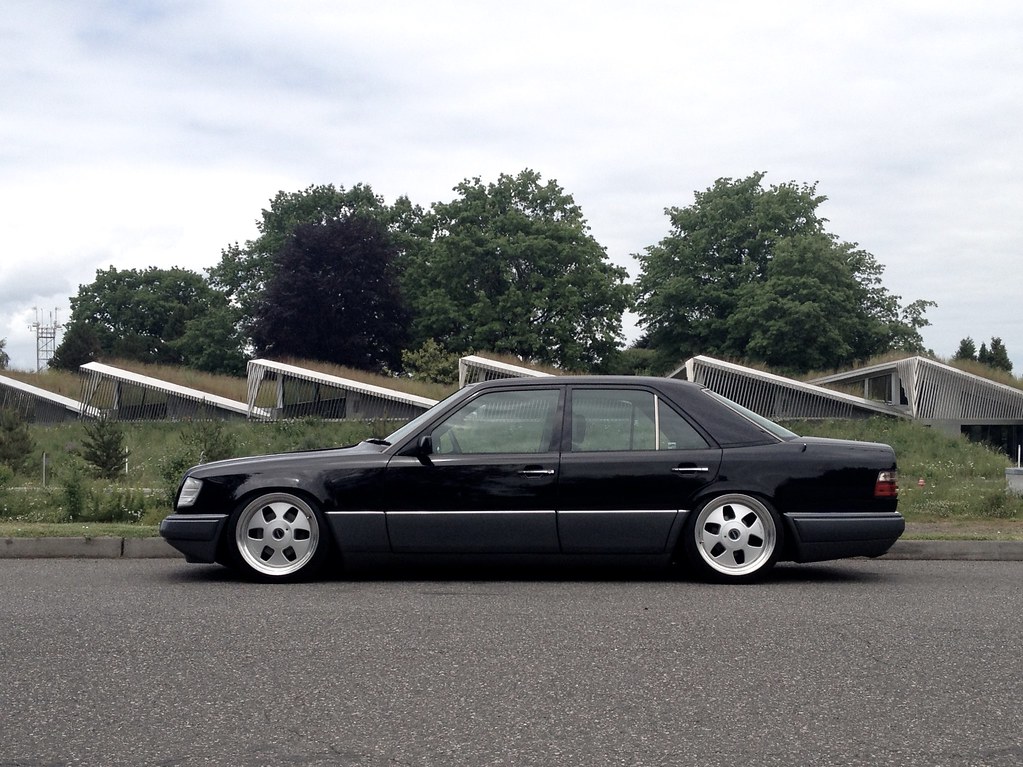
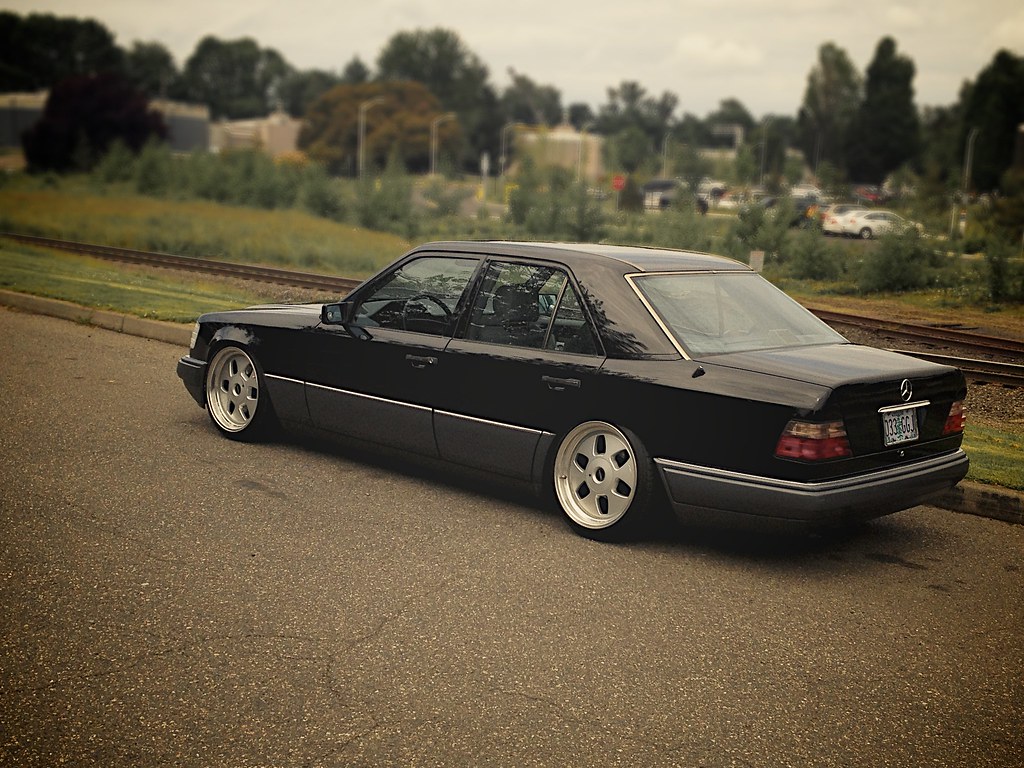
Anyway, with the new spacers on and the car passably clean, I snapped a few iPhone photos for you, my loyal readers:
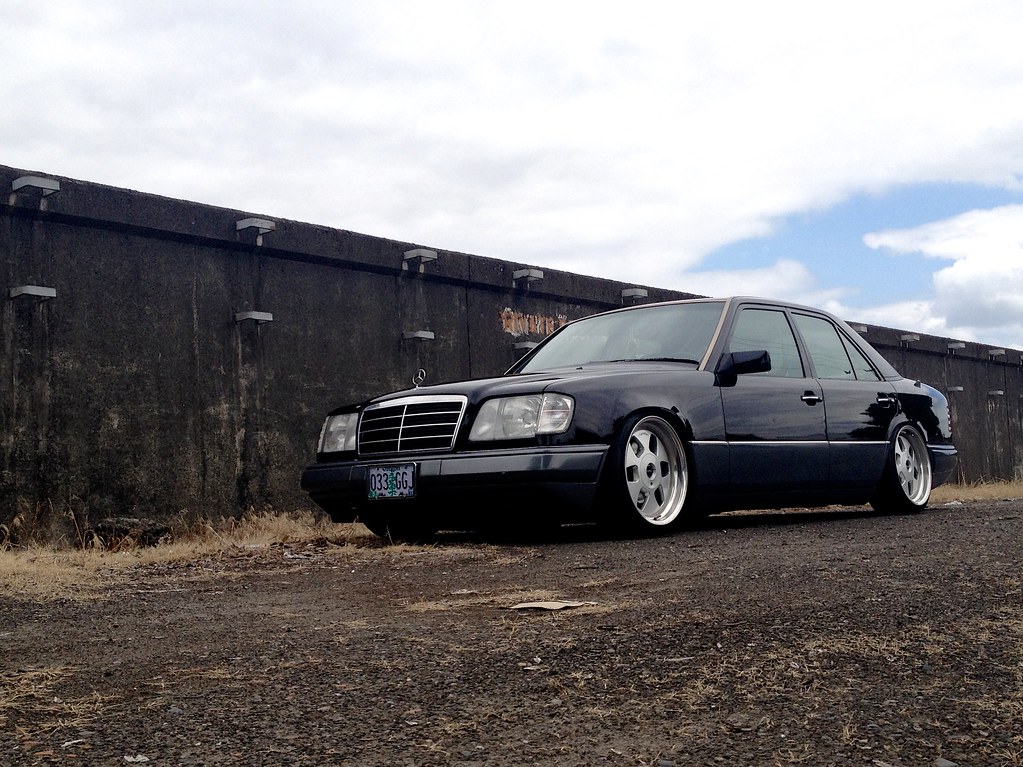
I also ordered some goodies today for MOAR LOW in the front... stay tuned!
Comment
-
I love your car so much... it's gorgeous1995 Mercedes-Benz W124 E320

Comment
-
Thank youOriginally posted by StayONE View Post I'm looking forward to seeing yours come together as well!
Today's work:
As you'll remember, I whined earlier in the thread that the car wasn't airing down evenly. The AccuAir ECU was pulsing the front valves on air down, which caused the car to "ratchet" down awkwardly. I'll repost the video here so you don't have to search for it:
[ame="http://www.youtube.com/watch?v=Dz7yC-yNmf8"]http://www.youtube.com/watch?v=Dz7yC-yNmf8[/ame]
A couple of folks here concurred with my guess that the ECU was trying to keep the drop rate even front-to-rear, and was pulsing the front valves in order to slow the front down somewhat. The solution was to add flow controls. Lots and lots of flow controls.
I first tried sticking my flow control block to the back wall of the trunk like so:
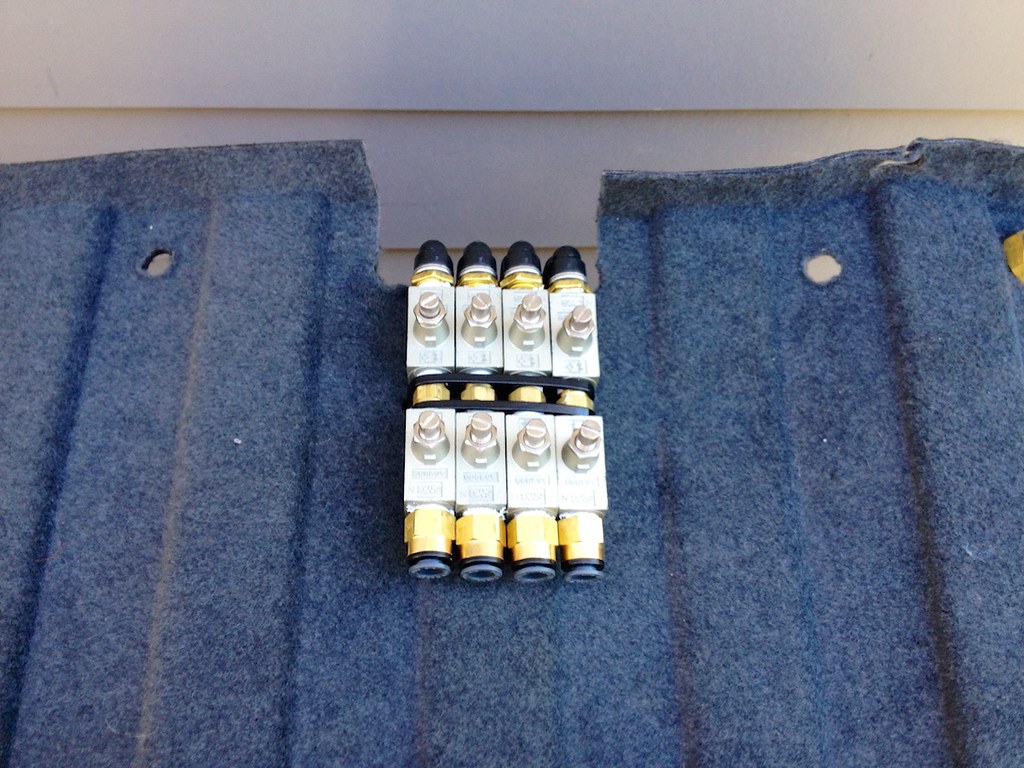
Here the flow controls were hidden behind the tank, but they were impossible to reach to adjust, and they made the installation of the back wall nearly impossible to do without it wanting to bow outwards. I also discovered that, since the back wall of the trunk is not rigid, they would bang into the tank when going over speed bumps. Not going to do.
Instead, I grabbed some 1-1/2"x1/16" aluminum L-channel that I had laying around in the garage, and mounted the flow controls through it. I stuck it to the bottom of the tank like so:
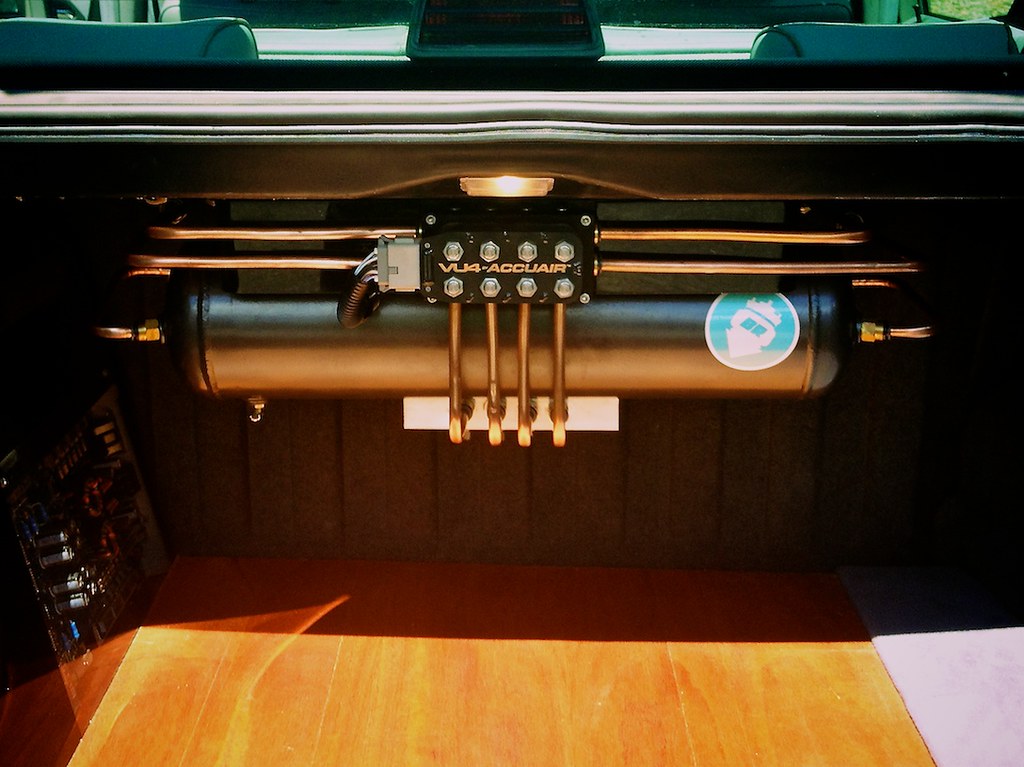
I'm not completely in love with this solution - I think the corners of the aluminum need to be rounded a little bit, and the aluminum maybe wants to be black, but it'll do for now. I also bent up new copper lines to run from the VU4 to the flow controls. I'm starting to contemplate ditching the copper hard lines and replacing them with aluminum - the copper is just SO soft that it all has little bends in it, and it mars badly when run through the bender.
Finally, I got sick of listening to the air ride exhaust, so I routed it down the right side of the trunk and stuck it out the flappy air pressure vent just aft of the rear wheel:
Exciting stuff!
EDIT: Also, just for your amusement, I tried to do a slight pull to the rear fenders using the phone book method. The sheet metal on these things is so thick and solid that the car will just sit on the phone book without even beginning to tweak the fender outward. Fucking car Last edited by Oh Damn, it's Sam; 06-09-2014, 05:00 PM.
Comment
-
Mine's definitely slow going right now. Replaced the blower motor regulator so now my AC is in working order just in time for 105+ degree weather every day. Also did the cabin filters while I was in there, spent four hours running all the wiring for the subwoofer and amp & sorting out the mess the previous owner left the radio wiring in when he put in an aftermarket cd player... (he cut wires...Originally posted by Oh Damn, it's Sam View Post ) and rear diff bushings I'm going to try to get done after work today.
Oh and I removed the US plate adapter on the front and got a euro plate. Cleaned up the front more than I though it would.
haha didnt mean to thread jack! 1995 Mercedes-Benz W124 E320
Comment
-
Just an FYI for the locals: won't be making it to Leavenworth this year. Personal reasons. Have to catch all y'all another time.
Comment
-
Nice work, and build. I've heard though fender lips are super heavy duty. Hope all these air ride problems get sorted, so you can enjoy it.Comment
-
Arduino time!
The pulsing gives it lowrider status though
𝔣𝔬𝔩𝔩𝔬𝔴 𝔪𝔢
@𝔳𝔦𝔳𝔢_𝔪𝔢𝔪𝔬𝔯_𝔩𝔢𝔱𝔦Comment
-
Shameless self-promotion time!

My friends at TrueFitment.com were kind enough to contact me and do a feature on my build! The article is in Russian, but in any case, cruise on by and check out a bunch of exclusive photos of the ol' Mercedes! Article Link
Arduino updates coming soon, just working some kinks out of the setup...
Comment
-
-
Originally posted by rightfullrudder View Post
Maybe I'll hang a pierogi off my back bumper as a drift charm.
Comment
-
nice!Comment
-
Just finished reading the thread for a second time. Few comments for what it's worth:
Amazing build and awesome car.
Great you did this yourself!
Post-spacers I was hoping you'd go wider rims. Any plans?
The reason I joined this forum and checking out your thread is that I just bought a w124 and would like to emulate your setup (minus the hard lines and top of the line management)
Do you have any pictures of your airbags/brackets installed and in-situ? Pics of where your lines run through the mudguard area?
Did you get the top and bottom metal plates you had welded to the "cups"/brackets along with the SS5 bags?
Do you have a revised cup/bracket diagram after you fixed your rubbing issues? Where I live no one does airbags but there are plenty of welders.. if I can get something that works that I could get a decent welder with no airbag experience to create I can test on my car
Comment
-
Thank you for the kind words!
Wider rear wheels are in the plans at some point, but frankly, I really like the MAEs on there. I think I could cram 10.5s in the back if I wanted, but there aren't many wheels out there I like better than what I've already got, at least not in my price range. My plan is to refinish the MAEs and run them for a while until I get bored.
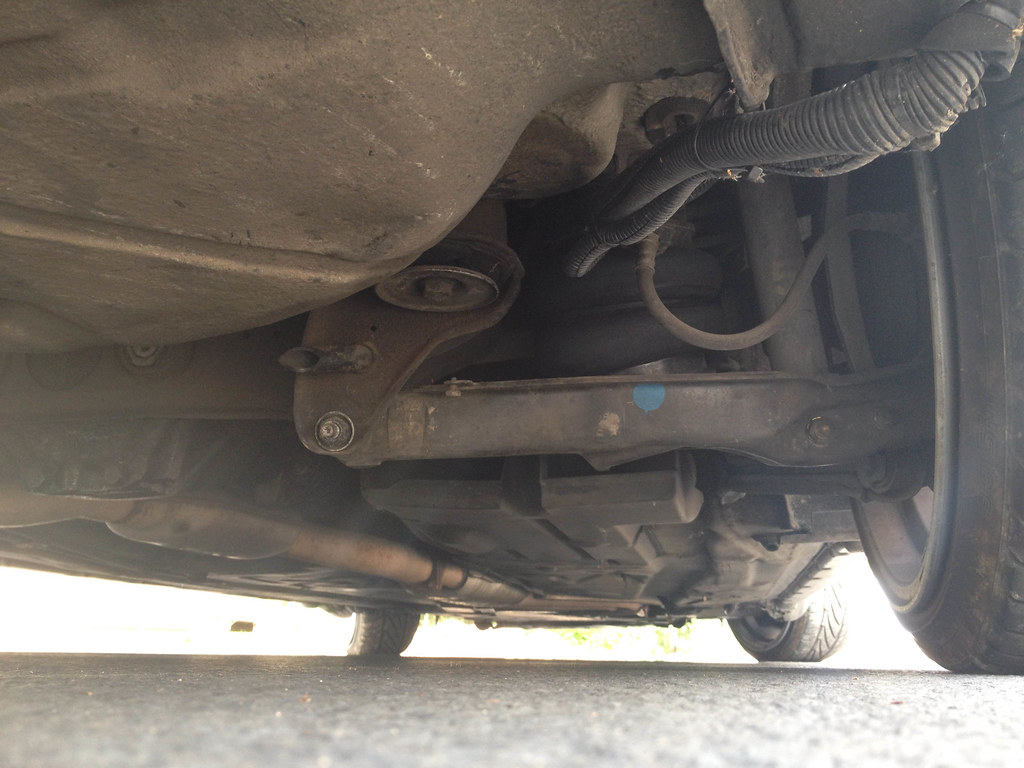
I went out today and took some new pics and measurements for you. They're not the clearest, since it's a PITA to get photos of the suspension setup with the car on the ground at ride height, but hopefully it will help.
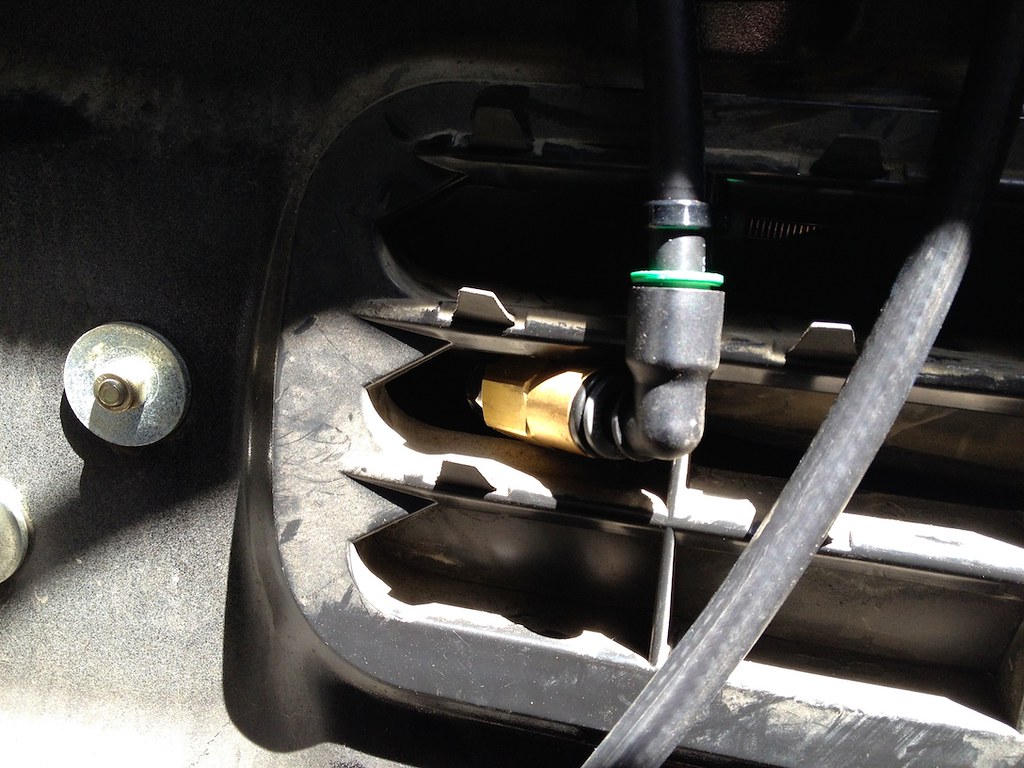
Front at ride height:
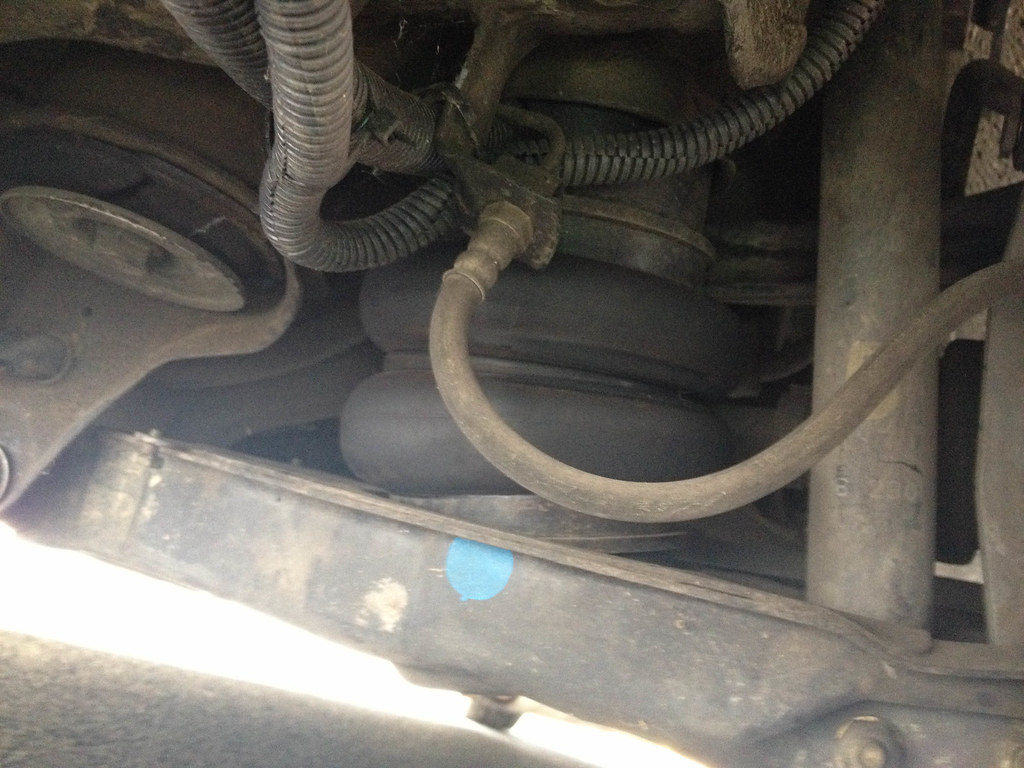
You can see how the line and wiring is routed here. If you're planning on going very low, I'd consider a different route to eliminate the possibility of rubbing. Hasn't been an issue for me yet, but YMMV:
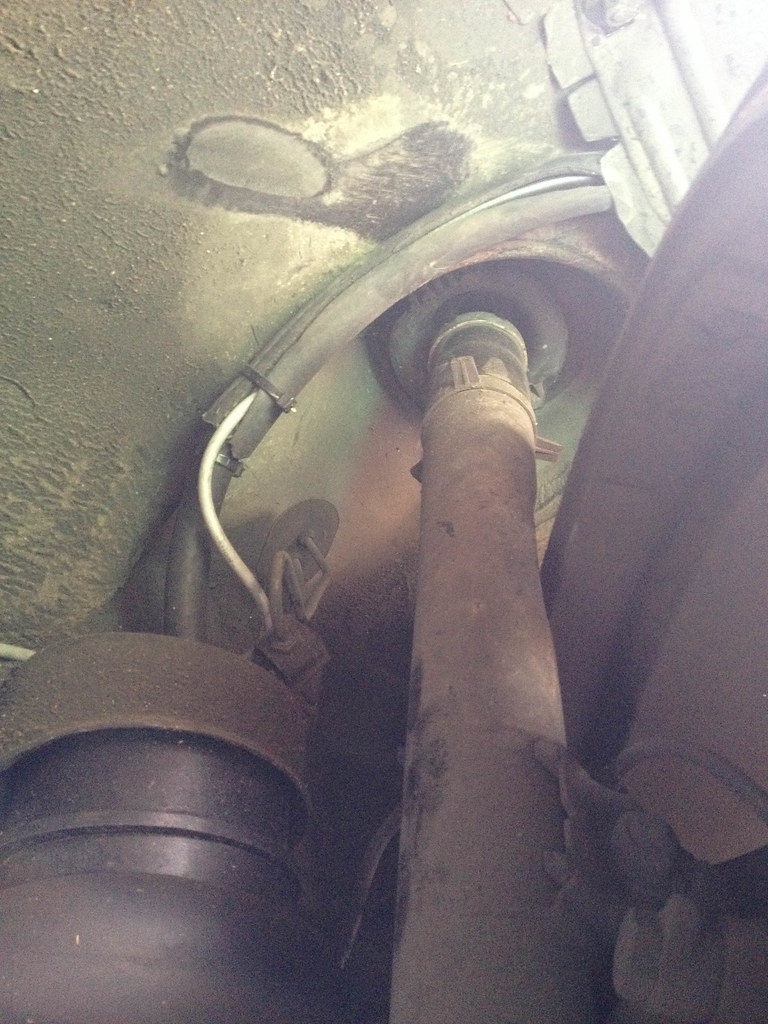
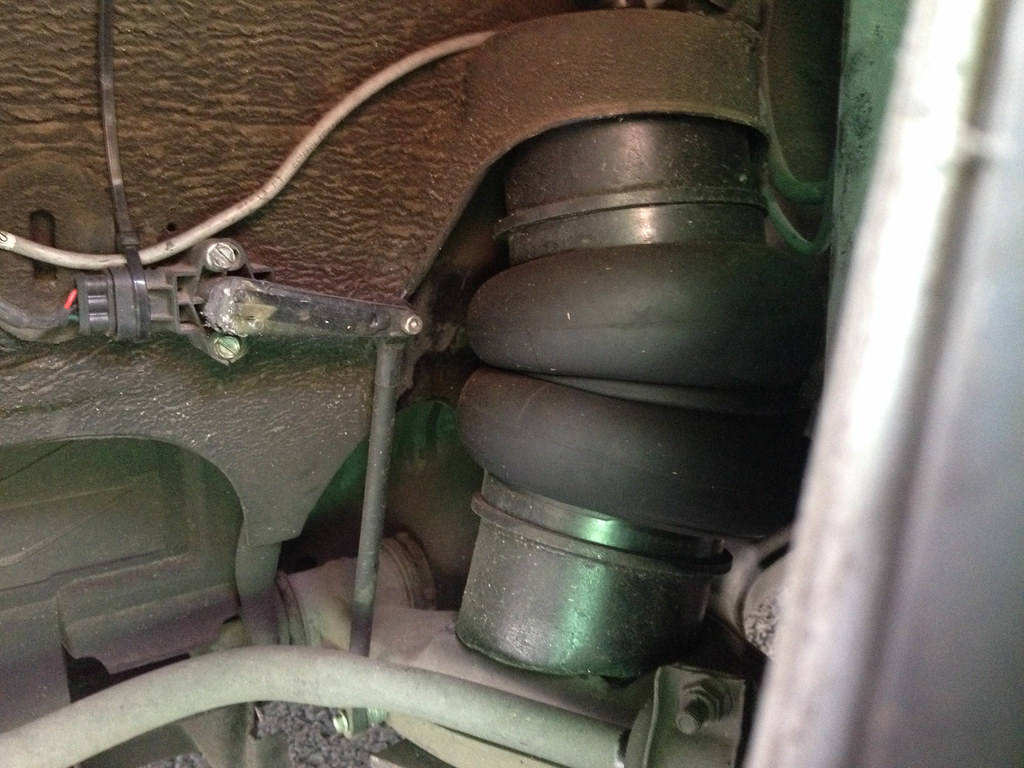
A couple shots of the rear:
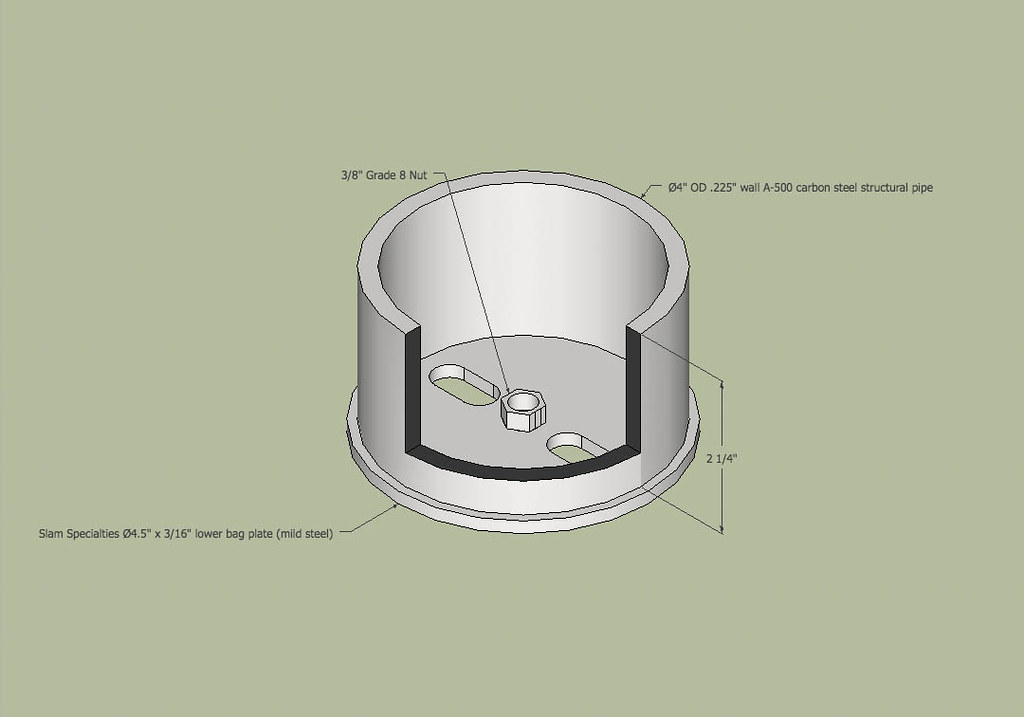
The bag plates I just got pre-cut from Slam Specialties themselves. They're dirt cheap and totally worth the money.
Some updated measurements for the bag brackets:
Front upper:
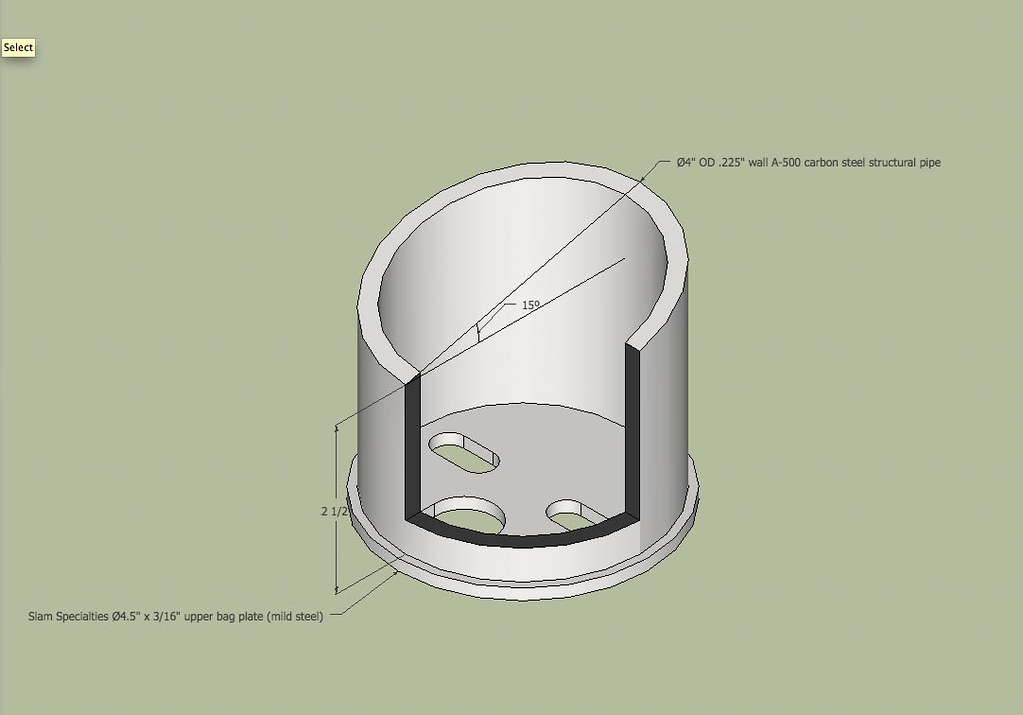
Front lower:
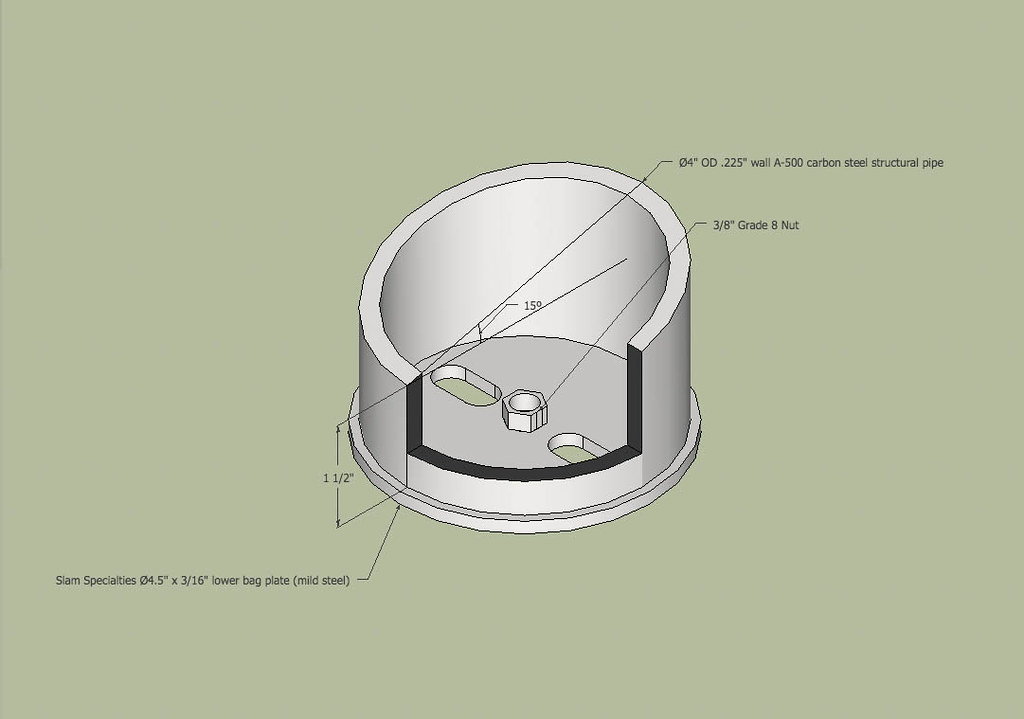
Rear upper:

Rear lower:
Were it me, at least in the front, I'd leave a little margin for error in those length measurements, and plan on spending some time with an angle grinder to get it perfect. I've mentioned it before, but the front suspension is extremely tight, and it's a little unintuitive how everything needs to fit together to make it work and not rub while driving.Last edited by Oh Damn, it's Sam; 09-11-2014, 10:41 PM.
Comment


Comment